What are nests for laying hens for? First of all, the presence of properly designed nests will ensure the quality of the eggs. Namely, the eggs will remain clean, the chickens will not peck at them, such eggs will be easy to store.
If you do not arrange the hens for comfortable nests, they will start arranging them spontaneously, in any corner they like. You do not want to "harvest" around the chicken coop? This is not just inconvenient, but highly undesirable. In addition, in the presence of nests will not have any problems with cleaning the room.
Is it difficult to make nests by yourself? Not at all. If you have ever held a hammer in your hands, you will succeed. In this article you will find step-by-step instructions on the construction of nests for laying hens.
What can be used as a nest for laying hens?
Before starting to build a solid nesting area, it is possible to provide chickens with minimum comfort with the help of scrap materials. As a nest for layers you can use wicker baskets, cardboard boxes, plastic and wooden boxes.
Before using such a container in the form of a nest, you need to make sure that it is whole and does not have sharp chips, protruding nails that can accidentally injure the bird or damage the egg.
Also pay attention to the parameters of the future nest. For chickens of medium breeds suitable capacity of approximately 30 cm x 30 cm x 30 cm (width depth height). Such nests are located in the darkest and quietest corners of the house so that no one can disturb the hens.
If the self-made nests are not comfortable enough, the birds will not want to rush in them, and the farmer will certainly notice it. It is better to replace the temporary structures with more solid ones.
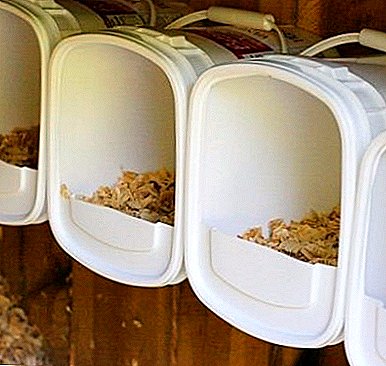
- From plastic buckets

- From wooden boxes


- From plastic boxes

Basic rules for the arrangement and use of materials
Before building a nest with their own hands, each farmer must well remember a few important rules. First, when working with chipboard and other wooden materials Never use nails longer than the thickness of the material used..
In this case, they easily pierce the slab and stick out on the other side, which means they can severely hurt the bird.
Secondly, nests cannot be set up in damp places. Often a poor microclimate causes colds in chickens, which negatively affect their overall productivity.
In no case do not need to place a nest for a hen hen near the entrance to the house. Even if it is well heated, there will be a slight movement of air. Sitting in a draft, the hen can get sick, and the eggs can deteriorate.
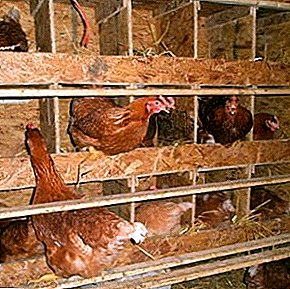
Proper placement of birds in the hen house is very important.

Well organized room for chickens
As for the filler for the socket, no need to fill too much sawdust. During the brooding period, the chicken may accidentally roll an egg, and it will become unsuitable for brooding. It is equally important to follow the rules of hygiene when choosing material for bedding in the whole chicken coop.
Ideally, the walls of the nest should be several centimeters higher than the layer of sawdust.
If everything is done correctly, the laying rate of chickens will increase significantly., as in more favorable conditions the birds are able to be carried much better.
In general, organizing the correct maintenance of laying hens is not as simple as it seems.

The optimal location of the nests in the hen house
How to do it yourself?
Why do many farmers prefer to build their own nests for birds? This makes it possible to create a nest corresponding to the size of the chicken and the desires of the breeder. We will tell you how to build three types of nests in our hen house in this article.
So, we need the following tools and materials.:
- a sheet of plywood or chipboard with a thickness of at least 1 cm;
- four wooden bars 2,5cm x 2,5cm;
- jigsaw and file;
- screws and screwdriver.
To determine the size of the sheet you need to take into account the size of the future nest. It is believed that nests with a size of 25 x 35 x 30-35 cm are suitable for chickens of egg breeds, and 30 x 40 x 45 cm (width-depth-height) for meat and meat-egg breeds.
Experienced poultry farmers say that for 10 chickens it’s enough to have 2-3 nests..
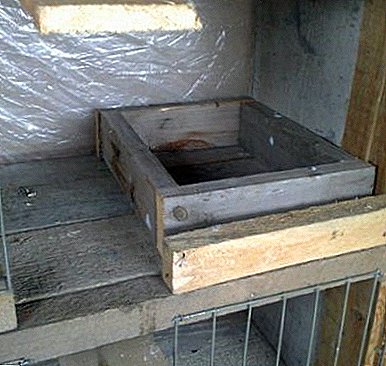
Nest-booth
Nest-booth is the easiest option. For its manufacture does not require special skills or materials. This species is quite popular, despite the fact that chickens in it can sometimes damage eggs.

Three-section nest
Instructions for making the nest box:
- We process the edges of a chipboard sheet with sandpaper or a file.
- Cut out 4 identical squares of the size we need (35 x 35 cm) - the walls for the nest.
- In one of the squares we outline and cut a hole for entry with the jigsaw. At the bottom you need to make the threshold.
- Cut off the four bars on the height of the walls.
- Cut the squares into a box using screws and a screwdriver.
- We are convinced that there are no chips anywhere and do not stick out the ends of nails or screws.
- Cut the floor and ceiling, attach them to the structure.
In the video you can see a great example of the construction of a simple chicken nest in the form of a booth or box:
Immediately after completion of construction, you can worry about the filler for the nest. Straw does an excellent job with this role, but it is better to use oak or pine sawdust.
They have a much larger mass than straw, so the bird will not be able to throw them out of the nest during the laying of eggs. It is enough to fill 1/3 of the total volume of the "box" to make the chicken feel great.
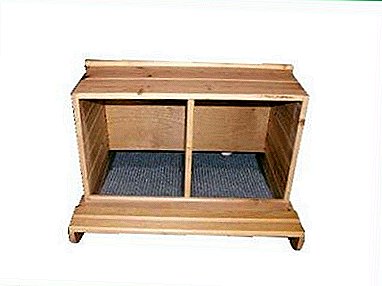
Eggbed nest
This kind of nest is considered the most comfortable and safe for chickens. It is not much harder to assemble, but it has a lot of advantages. For example, eggs will be 100% safe, as chickens will not have access to them. Yes, and collect eggs will be much easier.
It differs from a simple nest-booth in that the bottom is made with a slight bias. It is through him that the eggs roll into a special tray.

For the production of such a nest will need the same materials that were listed in the section above.
Instructions for assembling a nest with an egg digger:
- To process the materials and prepare the tools.
- Cut out the side rectangles for walls of 65 x 90 cm in size.
- Cut the front wall with a size of 65 x 40 cm.
- In the front wall we make a hole for entry, about 35 cm high.
- We connect the side walls with the front with the help of bars.
- Cut out rectangles of 40 x 90 cm in size for the floor and the ceiling.
- We attach the floor and ceiling to the walls with the help of bars.
- We cut a half slope of 40 x 95 cm in size. It will be located above the main floor with an inclination of about 15 degrees.
- We fill the floor with a layer of sawdust and lay the ramp, fix it with screws.
- Cut the back wall of 40 x 45 cm in size. It is somewhat shorter, because we need a hole where the eggs will roll out.
- Attach the back wall with screws, close the hole with a curtain.
- Attach to the nest box for collecting eggs. To do this, you can use any suitable size.

A thin layer of sawdust or straw is used as bedding in such a nest. Eggs should easily roll down the sloping floor without getting stuck anywhere. In the collection box you need to put something soft that will prevent the shell from breaking.
In this video clip you will find useful information about creating a nest with an egg-collector:
Double bottom nest
A double-bottom nest or “trap nest” is another tricky option that prevents chuck and any other contact between chickens and eggs. The bottom of such a nest is double, with the upper tier having a slope and a hole into which the eggs roll, falling into a special collection tray. This is a very convenient nest option..
- Using the instructions for the construction of the nest-booth, we are building a house with a slightly larger size - 60 x 35 x 35 cm. We are not fixing the front wall yet.
- Cut two halves of the sloping floor with dimensions of 35 x 15 cm. After we fix them, there should be a gap between them into which the eggs will freely pass.
- We attach one half to the back wall at a height of 20 cm and at an angle of 15 degrees.
- Where there should be a front wall fasten two partitions.
The lower partition is 10 x 35 cm to which the second half of the sloping floor has been previously nailed. Between this partition and the bottom there is a slot for the collecting tray.
The second partition has a size of 15 x 35 cm, it is attached to the top of the nest, covering the entrance.
- Now you need to build a sliding tray for collecting eggs. You can knock it to size or use any suitable.

The tray is lined with a thick layer of soft material so that the eggs do not beat. The bottom-slope is lined with a thin layer that will not impede the movement of eggs.
This video provides useful information on creating trap nests:
Mounting in the house
After production, self-made nests should be attached to the walls of the poultry house or to special supports arranged in advance.
When fastening to the wall on a wooden plate, from which the wall of the barn is made, with screws the board is fixed with parameters 30x4x2cm. It will play the role of the foundation on which the nest will hold.
At an angle of 45 ° is screwed another such board. This should be done in such a way that the angle diverges towards the bottom of the structure. The distance between the ends of the slats should not be less than 40 cm. After about 45 cm, exactly the same construction is made on the wall, with the same angle, but it will converge in the upper part.
The result should be a convenient compartment where the chick's nest is easily inserted.. But do not forget that the nest needs to be hooked with screws to a slanting bar.

Option of attaching the nest to the wall of the coop
The main thing to remember is that in no case can the nests be screwed to the bare wall of the chicken coop. The fact is that the plates from which it is made are usually quite fragile and after a few months of use they will begin to crumble under the action of the weight of an ordinary chicken.
Some bird breeders organize special stages in their hen house. They represent a support table knocked out of boards or bars. For the convenience of the bird, it is located at a height of 50 cm above the ground.

Installation of nests on the scaffolding
Useful tips
The equipment of the correct chicken nest is, of course, a very important point, but this does not end there. The farmer still needs to make the chicken want to lay eggs there. But how to do it? First, let's look at the main points about how chickens choose a place to hatch.
They first need:
- Dark room.
- Dry and soft flooring.
- The absence of parasites.
- Good microclimate.
Check whether these conditions are met, if so, your chickens will certainly accept new nests and I will rush to them.
Poultry farmers who have long been engaged in the breeding of chickens know many subtleties not only about how to accustom chickens to the nest, but also on the whole to increase egg production.
Here are some of them:
- Chickens will not peck eggs if you provide them with sand or small gravel.
- Find a crate in the hen house. Such a birdbath will relieve them from parasites.
- Ensure the coil temperature is even. + 12 is the optimum temperature for laying eggs.
- If the chicken stubbornly leaves the eggs in different places, leave one of the previously demolished ones in the nest, or put a round piece of chalk or another model there.
Nest care
Proper care of the nests is a prerequisite for growing healthy livestock.
Here are the highlights of this process.:
- Nests should be kept clean and dry.
- Dirt, wet filings are removed daily.
To prevent parasites and pathological microbes in the nests, such preventive measures should be taken.:
- To fumigate with special swords intended for premises with an agricultural bird.
- Wash floors, walls, supports with a solution of bleach (requires subsequent ventilation).
- Control room humidity and provide ventilation.
Every three months should check the strength of the mounting nests. In the autumn, it is necessary to check the chicken coop at the time of warming, to replace the damaged heater. As soon as the first frosts come, check the room temperature twice a day.
Ready or built by yourself?
Properly constructed chicken nests allow the farmer to increase the egg production of all hens in the yard. The fact is that chickens feel more comfortable in such nests, as the breeder builds them based on the needs and conditions of the hens. In addition, these nests are much cheaper than the store.
If you do not want to spend your time making chicken nests, you can purchase ready-made. Such products can be found on thematic Internet resources, in specialized workshops, in agricultural markets and in specialized stores.
Manufacturers often offer this kind of ready nests:

- Prefabricated metal


- Plastic socket

- Closed wooden

The price range of ready nests is from 850 rubles for a single open nest and up to 3000 for a double vertical one. Usually, in specialized stores, you can also buy cages, incubators, drinkers and feeders, and even whole chicken coops.