 Picket fence - one of the most popular fences in the people. This is due to its strength, durability and reasonable price of building materials. Such fences can be created with your own hands in just a few days. Further in the article we will talk in detail about the types of these structures and the rules for creating your own fence from a picket fence.
Execution options
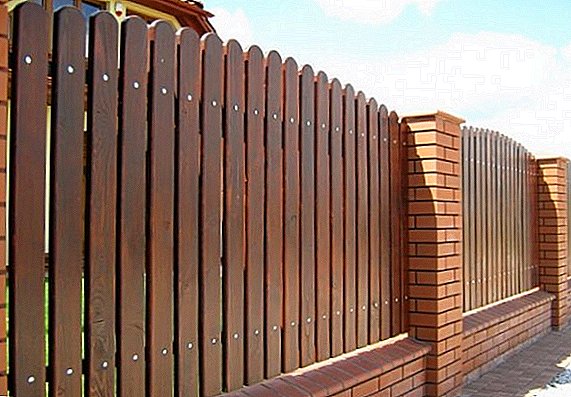
A fence made of picket fence is a fence that is made of vertically mounted slats and transverse crossbars. Reiki can be from the most different material: metal, wood, plastic, polymer composite, polyvinyl chloride, etc.
In addition, the slats do not necessarily have to be placed vertically - some craftsmen make elegant fences with a semi-circular, horizontal or crossed arrangement of the picket fence.
Important! When constructing a wooden fence, self-tapping screws for fastening the shtaketin need to be wetted in drying oil. This will extend the life of the fence.
It is best of all to do the layout of the shtaketnik when working with wooden material, since it is easier to correct with respect to length and width. This is especially true of those people who want to build a fence for the first time with their own hands and at the same time want to dream up with possible layouts.
The most popular options remain:
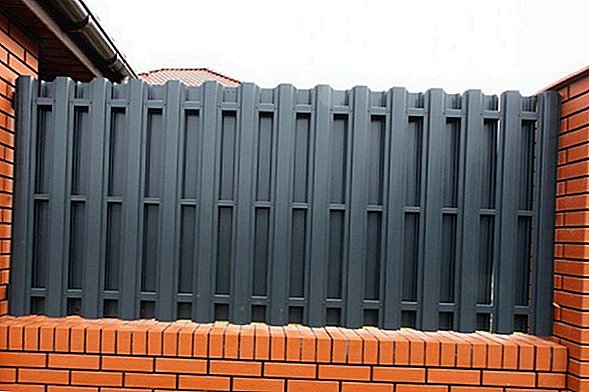
- "Chess". To obtain such a beautiful surround fence, the picket fence needs to be packed alternately on both sides.
We advise you to read how to make the fence itself from the netting of the chain-link, gabions, as well as how to make a wicker wooden fence.
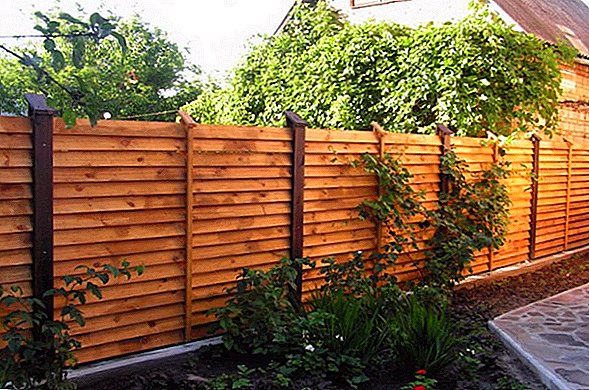
- Herringbone. This is a subtype of horizontal fencing. It is made by placing a picket fence closely with a small overlap (about 1/3 of the width of the slats).
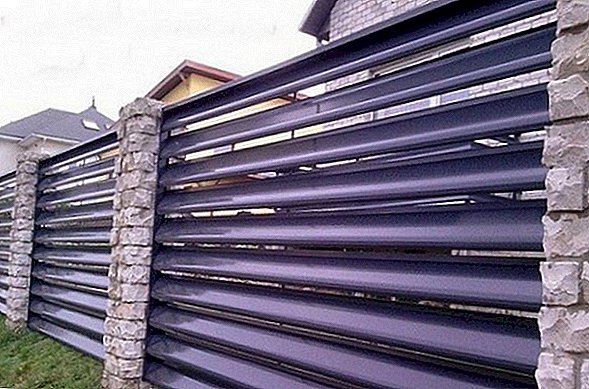
- "Jalousie". Another type of horizontal fence, but in this case, the slats are fixed at an angle and with a small gap.
There are a lot of variants of execution, but the embodiment in reality of some of them (without experience in the construction of fences) remains an almost impossible task. The simplest option: order a shtaketnik of an elegant form from a master (you can think up a drawing yourself), and then simply install it in a vertical form.
You will probably be interested to read about how to build a formwork for the foundation of the fence.
From wood
The most popular type of fencing private cottage sites. Wood remains one of the most affordable and environmentally friendly building materials. To install the fence from it, you will not need exotic tools and special skills or knowledge.
Moreover, professional craftsmen can build you a unique decorative fence made of wooden shtaketnik, which will be much more difficult to create from other material. 
Of metal
In this case, the slats are made of special metal alloys, which are coated with polymer coating. They have different lengths, depending on the needs of the buyer (180 cm, 230 cm, 260 cm, etc.).
Unlike a professional flooring, a metal picket fence leaves gaps between which sunlight can get into your area. The tops of the metal slats can be made in the shape of a W, such a design is a kind of protection from uninvited guests. 
We recommend reading about how to build a toilet, a cellar, a veranda, as well as how to make a garden swing, a bench, a stone grill, a polycarbonate gazebo and a walkway made of wood with your own hands.
From plastic
Plaster based on plastics is increasingly gaining popularity recently. In most cases, this is due to the low cost of the material and the wide choice of various designs on the market.
Plastic shtaketnik has a hollow core structure, which is why it is rather fragile, especially when exposed to negative temperatures and ultraviolet (the source of the latter is the sun's rays).

But science does not stand still, and today you can buy a fairly strong and flexible plastic, and the fence from it will be as durable as from metal. For example, polyvinyl chloride is a durable, flexible type of plastic that can withstand high mechanical loads.
In recent years, the wood-polymer composite (WPC) fence has become increasingly popular. WPC fences can withstand temperatures down to -60 ° C and heat up to 100 ° C. WPC does not fade in the sun and does not contain harmful additives, therefore, is increasingly used as a starting material for the manufacture of fences.
Did you know? In the south-east of Australia is the longest fence in the world. Its length is 5614 km. It was built at the end of the 19th century to protect the sheep from wild dingo dogs hunting them.
Installation and installation of fencing
Installing a fence made of picket fence is not the most difficult task, but it still has its own nuances and rules. Next we will talk about this in detail. 
Necessary tools and materials
For the manufacture of wooden fences we need:
- wooden posts that will be used to install the supports;
- timber - 40 * 40 with a length of about 200-250 cm;
- prepared for installation of shtaketina;
- stakes and cord for marking the area;
- concrete and crushed stone for the installation of supports;
- bitumen mastic, roofing material and antiseptic (for waterproofing supports);
- manual or electric drill, tape measure;
- wheelbarrow;
- concrete mixer (if you are going to buy ready-made concrete, you will not need it);
- tamper;
- bayonet and shovels;
- scrap.
Important! When buying finished wood material, pay attention to its smell. Raw material with the "flavor" of mold indicates that rotting has begun in the wood.

If you are going to construct a fence from a metal picket fence, you need to acquire the following materials and devices:
- welding machine;
- screwdriver or electric drill;
- rivets or screws;
- level;
- Bulgarian;
- prepared metal shtaketina.
If you also plan to decorate your plot, you will be interested to learn how to make a fountain, waterfall, rock arias, a dry stream, a ladybird, a bed of wheel tires and stones, a rose garden, and also how to decorate a tree stump with your own hands.
In addition, you will need supports, concrete, auger and other accessories for the design of the fence frame. All this we have described in the list for a wooden fence.
If you are going to fence your site with a plastic fence, it is best to immediately buy ready-made hedges, the whole point of the installation of which is to install supports and attach the finished plastic sections to them. These sections have already been built (plastic shtaketins are attached to the cross bar).  You can buy the entire structure in a disassembled form, but then you have to fix the fence itself, using rivets or glue. The tools required for installation are the same as in the previous cases.
Installation of supports
The durability and reliability of the fence will depend on the quality of installation of the support posts. The supports can be hammered deep into the ground by means of a sledgehammer, you can concrete, but it is best to install them in a parapet flooded with concrete.
The last installation option has several advantages at once:
- hedge construction will be more resistant and reliable;
- the shtaketnik will not contact with soil moisture, which will significantly prolong its life;
- water from a neutral territory will not be able to freely reach you on the site.
The distance between the installed supports should be within 2-3 meters. Deepen the pillars need to 1-1,5 meters, although this is not a strict rule. Experts note that the support should be buried in the ground at least 1/4 of its length.
Video: how to set the reference bar
Wooden supports are necessarily treated with antiseptic and bitumen mastic. These substances significantly prolong the life of the columns, because untreated wood can completely rot in 10 years (the term also depends on the type of wood).
In addition, supports can be wrapped in roofing felt, which prevents excessive moisture from entering the wood.
Metal pillars can be concreted without pre-treatment, however, as well as plastic. The last two materials will not significantly suffer from contact with concrete or soil in the next few decades.
Important! When installing plastic or metal supports, be sure to put on a protective cap at the top, which will not allow water to flow into the pillar.
During installation, be sure to monitor the ideal verticality of the supports relative to ground level. It is recommended to install crossbars 5-7 days after the installation of supports (if the concreting method was used).  In case you just drove the posts deep into the ground (without concrete pouring), the cross bars can be installed on the same day.
Installing crossbars
Each span should contain two transverse crossbars, which are mounted parallel to each other and perpendicular to the main supports. Metal widths are attached using anchors or welding machines.
The second option is only suitable for those who have knowledge of the welding of metal structures. After the final fixing, the diameters are covered with soil (to protect the metal from corrosion).
If you install wooden crossbars, you must first cover them with an antiseptic and then paint them with any color you like. You can also fix wooden widths with anchors.
However, if your fence is small, having only a decorative value (that is, it will not be subjected to serious loads), the crossbar can be fixed with several screws or nails.  Plastic crossbars are mounted on rivets or special glue. However, in the overwhelming majority of cases for plastic fences on the support there is a special fixture, where the cross sections should be placed.
Mounting picket
Just a few words about the plastic fence fence:
- if you have purchased a hedge, on which you need to fasten the shtaketins yourself, then the complete set must include special connecting elements (and instructions for use);
- in most cases, plastic shtaketina attached on glue or rivets;
- it is best to buy ready-made fences that are installed in just two steps (digging in support columns and inserting sections into connecting mechanisms).
Attaching a picket fence to a crossbar is very simple, you just need to remember an important rule: the distance between adjacent slats should be the same.  To control this distance, it is necessary to prepare a template, which can be wooden blocks, a matchbox or a level (with which you control the flatness of the surfaces). It all depends on how tightly you want to position the pins against each other.
With regard to the connecting elements: for metal shtaketin, you can use special screws for metal or rivets, for wood - nails or screws. It is only important to choose the optimal length of the connecting elements (so that they do not completely penetrate the diameters).
Each fence needs to be fixed with two connecting elements at the top and two at the bottom. At the end of the work, the caps of nails, self-tapping screws or rivets should be painted together with the picket fence.
Longevity secrets
The durability of a plastic fence fence will directly depend on the quality of the material. We recommend buying durable composites, for example, wood-polymer.  Such a material can withstand both moderate mechanical loads and extreme weather conditions.
If you do not throw stones at such a fence, it will stand on your site unchanged for more than a dozen years. In order to protect wooden and metal fences for a long time, it is necessary to regularly treat them with protective coatings: varnish, primer, stain, etc.
Did you know? Polyvinyl chloride, on the basis of which plastic fences are made, is also used to create artificial leather, window profiles and airbags in cars.
It is advisable to paint the fence every 2-3 years, such procedures will protect the metal from oxidation, and the wood from rotting. If you are the owner of a metal fence, then only the supports and diameters should be painted, since the shtaketins themselves are already covered with a special protective coating. 
Advantages of fence fences
The advantages of these types of fences include:
- Ease of installation. Even a novice can build a fence; for this, it is only necessary to follow the rules that are described in detail in this article.
- Easy to care. Metal and plastic fences need only be cleaned of dirt and dust, and wood - covered with a protective varnish or paint every 1-2 years.
- Metal and plastic products are protected with a special polymer layer that prevents corrosion and various biological damage.
- You can create a design that will allow sunlight to pass through to your area.
- The cost of picket fences is moderate, especially when compared with concrete or stone fences.
- From the tree you can build a very beautiful decorative fence - you only need to use the imagination and attract an experienced specialist who will make your idea a reality.

The disadvantages of picket fences
Among the disadvantages of this type of fence are the following:
- Compared with profiled fences, shtaketniki more labor-intensive to install.
- A tree can lose its decorative beauty after 10 years (crack, crack, etc.). This can happen even with proper care, because a lot depends on the type of wood and climatic conditions of a particular region.
- A fence made of shtaketnik is fragile and can break under the weight of a person who will try to climb it.
Now you know what kind of picket fences are and how to install them correctly on your site. Play with imagination, connect the imagination and skills, and all you must succeed.
Feedback from network users


