Modern cottages have ceased to be exclusively places for summer short rest, and turned into areas with large houses where people spend a lot of time. And in summer, some summer residents even live there. People began to equip country houses with all the necessary devices and devices that increase the level of comfort. It should be noted that some devices are dangerous for summer residents, for this reason it is impossible to skip such a question as grounding.
What is grounding for
Grounding is necessary so that people can protect themselves and all those present in the house from possible electric shocks. To understand how important the issue of grounding, you need to remember the school curriculum in physics.
So, if the wire that comes from the appliance is broken or its insulation is broken, the electric current will break out and look for a place with the lowest resistance, since the current always tends to zero. In the absence of grounding the device will spark, which is unsafe for humans.
Important! Some switchboards in houses are equipped with special machines, which in case of breakdown or high load on the electrical wiring turn off the power supply to the house. Experts recommend installing such machines, because it prevents people from being shocked by electricity, as well as the possibility of wiring ignition.
Video: why do you need grounding
What home appliances need to be grounded
One of the most energy-intensive devices is the boiler, which is why it must be connected to the grounding circuit. An important fact is that quite often the elements and parts of the boiler are made of stainless steel, which has a poor resistance to wandering in search of zero current.
Such a current can easily hit a person who takes a shower or adjusts the boiler operation. Also, be sure to ground the washing machine, since it is constantly in high humidity conditions. A personal computer is also a source of danger to humans.
We recommend reading about how and with what to warm the basement of the house outside, how to make a blind area with your own hands, as well as what are the facades of private houses.
The fact is that its power supply has such a structure that the electric shock can be even greater than from a washing machine. Do not forget about the electric stove, which has great power, and therefore has a high probability of breakdown. 
The principle of the grounding system
Often, all electrical appliances operate on a single-phase network. An electrical circuit in such a network has two main conductors - a phase and a wire with zero value.
Did you know? A person’s resistance is 1 kilo-ohm, and a conductor’s resistance is only 4 ohms.
In the case of punching a vase of an electric appliance, a person holding an electrical appliance will receive the strongest electric shock, since the stray current will go to the ground, using the human as a conductor. The presence of a grounding system will allow current to be diverted through a conductor, the resistance of which is much less than the resistance of a person. 
What grounding schemes can not be done
Today, there are some earthing systems that are mistakenly considered working and efficient. Such systems can cause irreparable harm to humans, as they are unsafe.
You will probably be interested to read about what is best for water supply in the country, how to find water on the site for the well, as well as how to make water from a well.
These systems should include the following options:
- Use as unsuitable materials as a tap. When creating contours, people think that by using any metal product, you can protect yourself. In fact, this is far from the case. You can not use as a drain risers from the system heating, pipes, which were previously supplied water to the room, and those that are composed of plastic elements.
- Installing a special jumper in the outlet. In this case, unpredictable development of events and the creation of a dangerous voltage on the surface of electrical appliances is possible.
- Installation of an RCD protective device in the electrical network without a grounding circuit. If grounding exists, a similar device shuts off the area of the circuit in which the leak occurred.

Soil value
When installing a ground loop, you should consider the soil in which the grounding element will be installed, since the resistance of different soils will have different values.
If you want to decorate your summer cottage, we recommend reading on how to make a beautiful garden swing, a dry stream, a waterfall, a fountain, gabions, an alpine slide, a rose garden and rock arias.
The resistance of the soil depends on the components that predominate in its composition:
- solid clay - 50 ohms;
- sand - 1000 ohms;
- Chernozem - 200 Ohm;
- plastic clay - 20 ohms;
- plastic loam - 30 ohms;
- sandy loam - 150 ohms;
- loess loam - 100 ohms.

It should be noted that the layers with the lowest resistance are at a great depth.
To achieve a successful result in grounding, you can use the following methods:
- Immerse the tap as deep as possible, then the resistance will be as low as possible.
- Increase the distance between the main electrodes.
- Add special additional elements of the vertical type.
- Apply wider bends, the cross section of which is much larger.
We advise you to read about how to make a fence from the netting of a chain-link, picket fence, gabions, bricks and wickerwork.
Basic grounding schemes
Experts recommend the use of standard and proven grounding schemes for suburban areas. This is reasoned by the fact that such schemes have been tested for several years and have already proven their reliability and safety. 
The most reliable schemes are as follows:
- Recessed metal contour around the building. Often the main material for removal is the classic construction fittings. The bars of the fittings are interconnected by a welded metal tire.
- Among summer residents, there is also a common pattern of placing three electrodes in the ground, which are interconnected by a steel strip.
- The simplest scheme is the placement of a very long outlet at a considerable depth, which should be at least 6 meters.
Important! Painting ground elements that perform the function of a drainage deteriorates the conductivity properties.
- Fundamental grounding. This scheme is very solid, since it is a closed loop, which is welded in the form of a metal grid. Experts recommend laying such a grid on the bottom row of reinforcement in the foundation. Installation of this grounding is possible only during the construction of the foundation.

Use factory kits
The use of ready-made solutions for earthing in the villas will provide a high level of security, as well as provide certain guarantees for the operation of the system. However, not all kits are highly reliable and often require some modifications. Almost all factory versions of grounding schemes are made of high quality materials.
If you like to do everything with your own hands, we advise you to read about how to make a warm floor, to glue a plinth, how to put a socket and a switch, how to remove paint from walls and whitewash from the ceiling, how to glue wallpaper, to make a plasterboard partition with a doorway, how to sheathe wall plasterboard.
Today, there are the following types of ready-made grounding kits:
- copperplated;

- galvanized;
- set of stainless steel.


The name of each set depends on the material from which the discharge and some elements of the system are made. It is better to entrust the installation work of factory sets to specialists who have been working in this field for a long time.
This is reasoned by the fact that it is very easy to break or incorrectly install such systems, and their cost is quite high.
Order of work
It is best to entrust the work to specialists, but if there is a great desire to do everything with your own hands, then this is quite real.
System elements
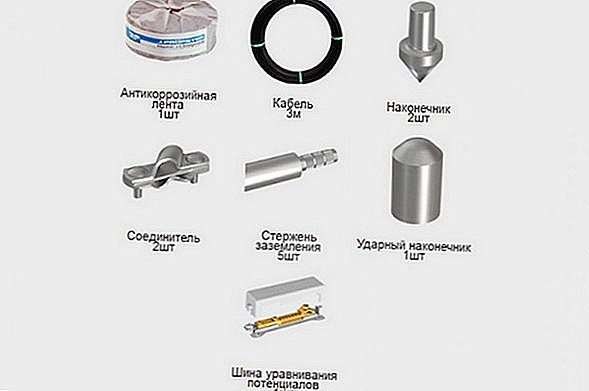
The main elements of the grounding system are:
- earthing switches - bends that are immersed in the ground to divert stray current;
- connecting material - elements that are used to connect earthing in a single structure. These can be a wire, strip or corner;
- grounding tires, which are made of electrical bronze. These buses connect all conductors;
- various fasteners.

Grounding depth
The standard grounding system is designed for the fact that the bends will be driven to a depth of about 3 meters. Some schemes require a deeper placement of the pins (in such cases, the depth is 6 meters).
Did you know? At Oxford University there is an electric bell, operating since 1840. The elements feeding it are filled with sulfur for tightness, therefore nobody knows exactly how they are arranged.
If the density of the soil does not allow placing the taps at the required depth, then their number is increased until the required resistance is obtained. 
Assembly process
The first step is to determine the location of the contour. The ideal option would be if the circuit is located at a distance of 10 meters from the power shield.
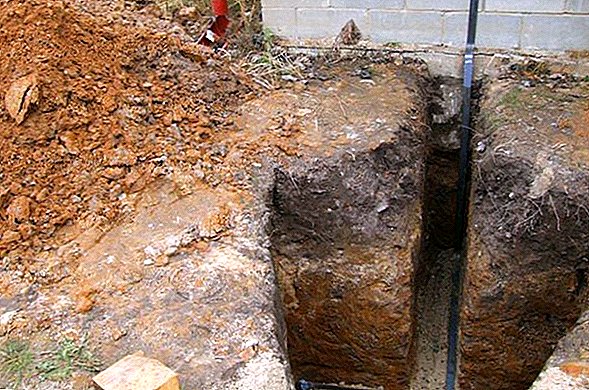
Now you can start the work, which should be divided into the following stages:
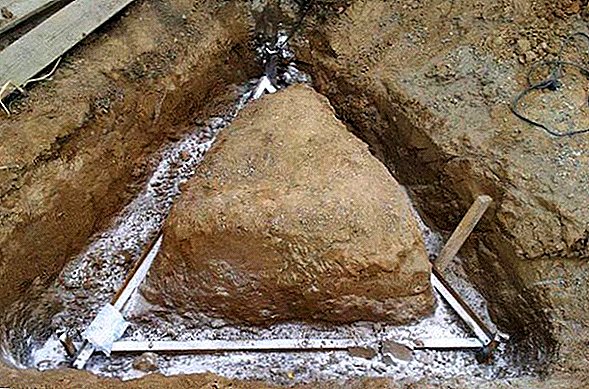
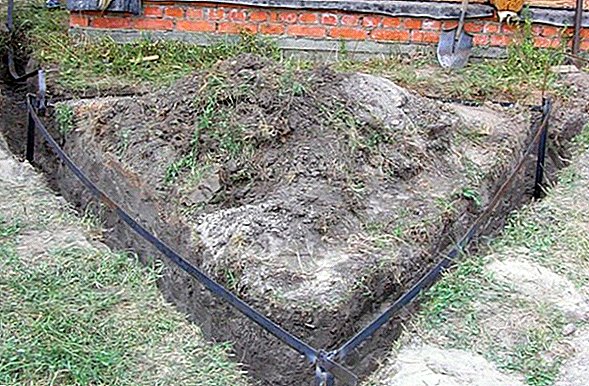
- Dig an equinox in the shape of an isosceles triangle. The pit should be like a strip foundation, with the distance between the rods should be at least 1 meter, width - about half a meter and depth - about 1 meter.

- Then you should dig a ditch, which will go from one corner of the triangle to the power shield.
- At the next stage it is necessary to immerse the pins in the ground, which should be placed at the vertices of the triangle. In some cases, you have to drill the ground (if the soil is dense).
Important! Long electrodes can be replaced with shorter pins, but their number should be increased. In this case, the properties and effectiveness of the grounding system will be the same.
- The rods must be driven into the ground so that they are visible above the ground. This is necessary so that the electrodes can be interconnected by bus. The cavity around the electrodes can be filled with soil, mixed with salt, it will help reduce the resistance of the electrodes, but it will accelerate the process of corrosion of metals.
- Next, you need to weld the strapping to the electrodes so that a triangle is formed.
- After that, you need to spend on the trench strip to the distribution panel.
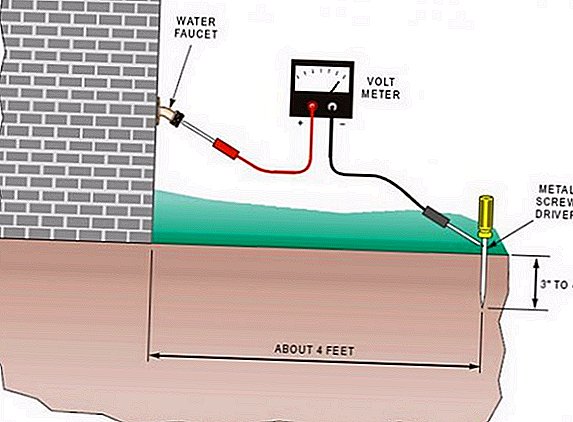
- Next, you should attach the conductor to the shield using a pre-welded bolt.
- Do not forget to check. It is imperative to check the resistance with an ohmmeter. A safe indicator is 4 ohms. If this indicator is obtained, then you can fill the trench. If the figure is more than 4 ohms, you need to drive a few more taps to get the desired resistance.


In the end, I want to say that it is quite simple to do the installation of the grounding system with your own hands. The main thing - to comply with safety precautions and safety when working with power tools.
Reviews from the network