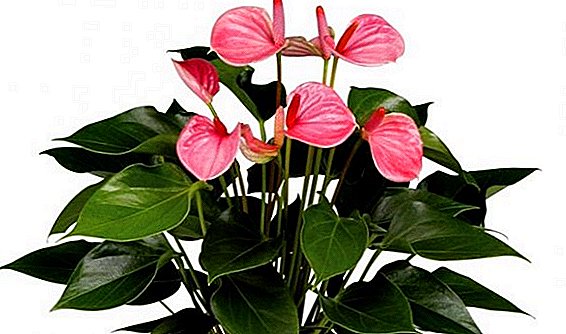
Gloxinia - a beautiful plant with bright, large flowers in the shape of a bell, arrived to us from Brazil. Despite this, it is considered a very unpretentious plant in the care. The variety of gloxinia species is easy to grow and propagate even to an inexperienced florist.
However, there are a number of rules that must be observed, especially for transplants. Consider everything in order in our article. You can also watch a useful video on this topic.
When do I need a transplant?
Gloxinia is transplanted regularly, since after a year's growth the old soil is depleted and becomes unsuitable for further growth. Cases when gloxinia is recommended to replant:
- When the plant woke up, small sprouts began to appear on its tubers.
- After buying small sprouts in a pot or tableware that is not suitable for life, they need to be transplanted.
- When were purchased tubers, not planted in the soil.
- When the plant was damaged by spider mites, mealybugs and other soil pests.
- When the plant develops fungal diseases.
Is it possible to plant a flowering plant?
 Is it possible to replant a flowering plant? It is not recommended to repot gloxinia during flowering. It will lose all its flowers and buds, as well as due to late intervention in the process of development and nutrition of the whole plant, tubers can die. However, in cases where the plant can only be saved by emergency replacement of soil, it is allowed to transplant flowering gloxinia. To do this, cut off all the available flowers and buds, as well as the stems with foliage located above the first pair of leaves.
Transplant - a huge stress for the plant.. Transplanting blooming gloxinia can lead not only to the loss of flowers, but also the death of the entire plant. Therefore, it is not worth the risk.
When is it best to perform the procedure?
When exactly can you transplant a home plant after flowering? It is best to transplant gloxinia in February or in March, when the tubers begin to wake up. The kidneys are a signal that they have begun to wake up. If the plant was hibernating in its own pot, then the first signal that it needs to be transplanted is the appearance of the top. If gloxinia has only faded, and it needs to be transplanted, then you need to either wait for the leaves to wilt or carefully cut them with a sterile blade.
Preparation: primer and pot
Transplant gloxinia should always be in a fresh substrate. It must be sterile, pass well moisture and air, as well as have nutritional properties. To do this, either a ready-made soil composition, or selected independently.
As a finished substrate, you can take the composition for violets and begonias, as they are related plants. As a drainage, you can use expanded clay or pebbles.
To independently prepare the ground, you must take:
- One piece of leafy ground.
- One piece of peat.
- Half of one part of the sand.
The second version of the soil composition:
- Four pieces of leafy ground.
- Two pieces of turf land.
- Two parts of humus.
- One piece of sand.
Soil acidity should not exceed 7 pH, otherwise gloxynia will slowly grow., and on it buds will be badly formed. In the case when the soil was made independently, it must be disinfected by careful steaming or a solution of potassium permanganate.
Board: You can also use the finished product "Maxim", strictly following the attached instructions. Otherwise there is a risk of infecting the plant through the soil.
Gloxinia pot should be shallow and wide. When choosing a pot, it is necessary to take into account the dimensions of the tuber itself:
- If the tuber is small, with a diameter of not more than 2 centimeters, then hundred plastic cups are perfect.
- If a tuber with a diameter of 2 to 4 centimeters, then it is necessary to choose a pot with a diameter of up to 9 centimeters.
- If the diameter of the tuber is more than 4-5 centimeters, then the diameter of the pot should not exceed the size of the tuber by at least 4 centimeters.
It should also be taken into account that in a tight pot, gloxinia will bloom faster.
Step-by-step instructions on how to properly conduct the process at home
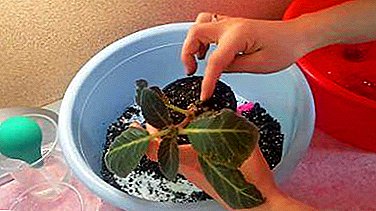
How does a flower transplant take place at home from one pot to another? To transplant gloxinia in a new pot, you must:
 Remove the tuber from a container with sand or from an old pot, carefully peeling it from old and rotten roots.
- Rinse the tuber with water, cut off all the rotten areas with a sterile knife and sprinkle with crushed coal. If the tuber had too many rotten areas, then for further prophylaxis you can soak it for 30 minutes in phytosporin or foundationol solution. You can also use the solution of potassium permanganate. After this procedure, it will be necessary to leave the tuber for a day to dry.
- The pot must be rinsed and dried. Bottom drain to a quarter drainage, and then fill the pot with soil.
- Make a depression in the soil at 2/3 of the height of the tuber itself, then place it there, slightly moisten the ground and cover with foil. Gloxinia leaves appear earlier than the roots. Therefore, until the stems are formed, the flower must be watered with care, taking care not to wet the emerging rosette of leaves. Once the stems are formed, tuber sprinkled with a centimeter layer of soil.
 Remove the tuber from a container with sand or from an old pot, carefully peeling it from old and rotten roots.
You can not plant the tubers "upside down". In order not to be mistaken, it is enough to remember: the lower part of the tuber is round and smooth, and the upper part has a small depression.
We recommend to watch the video about gloxinia transplantation:
How to grow?
Gloxinia can be propagated in several ways.
Of leaves
- Select young leaves during the budding of the flower, the length of the cutting should be from 3 to 4 cm. Then put the cutting in a glass with boiled water. As soon as the roots appear, you can plant gloxinia.
- To transplant, you must take a plastic cup, fill it with soil. From above it is necessary to put on a glass plastic bag.
- After new leaves are formed, it is necessary to remove the bag and carefully remove the old sheet.
There is a second method of breeding Gloxinia leaf:
- Select young leaves, as in the first method.
- Prepare the primer. You can buy ready-made mix in the store or cook yourself. It is recommended to add vermiculite to the purchased soil.
- The cutting before planting can be treated with a root formation stimulator.
- A plastic cup or a small ceramic pot will be suitable as dishes for planting.
- Fill the container with soil, not forgetting the drainage, and plant the cutting at an inclination to a depth of 1.5 cm. The soil around the cutting should not be compacted, as the plant needs to breathe.
- Cover the container with a plastic bag or a glass jar.
- Put the container in a warm place, the temperature of which is in the range from 22 to 24 degrees.
- After the formation of leaflets package or jar to remove.
If you are interested in this method of plant reproduction, we suggest you read the separate article, in which you will find instructions and tips on breeding Gloxinia leaf.
We recommend watching the video on Gloxinia reproduction with leaf cuttings:
From seed
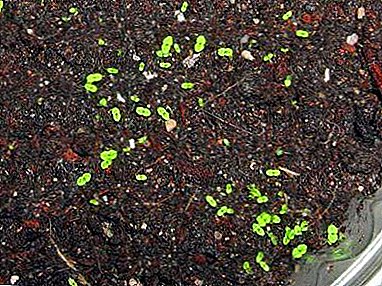 Sowing is best done in the winter. Seeds can be purchased at the store or independently collected from your plant.
- Soil pick up the same way as described in the second method.
- Take a wide container, for example, a container, and fill it with soil.
- Mix the seeds with sand and spread evenly over the soil surface. It is not necessary to fall asleep with earth.
- Spray the surface gently with a spray bottle and cover with a packet.
- Store container in a warm room. After there are 2 leaves, you can seat them.
- For seating pick plastic cups. They also fill with soil, make a small hole in it, and gently plant.
 Sowing is best done in the winter. Seeds can be purchased at the store or independently collected from your plant.
More information about growing gloxinia from seeds can be found in this material.
We recommend watching the video on the propagation of gloxinia using seeds:
Tuber division
Tuber division is the easiest way to propagate a plant. For this you need:
- Choose a tuber with a diameter of more than 6 cm, clean it from rot and roots, wait for sprouts to appear on it.
- Take a sharp knife, sanitize it, and cut so that each part has at least one sprout and one kidney.
- Sprinkle the slices with powdered charcoal and dry.
- Plant in pots with prepared soil and drainage.
More details about planting tubers, as well as gloxinia seeds can be found here.
We recommend to watch the video on breeding gloxinia by dividing the tuber:
We spoke about another breeding method for gloxinia - a tip cutting - in a separate article.
Care
In order for the plant to recover after transplantation and bloom as soon as possible, it is necessary to properly care for gloxinia:
- To provide the plant after transplantation moderate watering. It is necessary to distribute water throughout the pot.
- Observe the temperature: the optimum will be 22-24 degrees, the maximum - 28 degrees, the minimum - 18 degrees.
- Provide the plant with enough light. Light must be diffused, otherwise burns on the leaves will appear. Duration of daylight hours is 10-14 hours.
Conclusion
Gloxinia transplantation - the process is not complicated, but requires compliance with a number of rules. If you make a transplant after a period of rest, use suitable soil and dishes and follow the rules of care, then soon the plant will delight with its beautiful flowers.