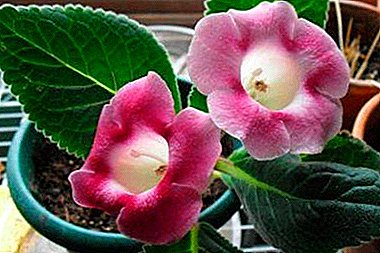
Gloxinia is a plant belonging to the genus Hesneriaceae; growing such a flower is a rather painstaking process, during which there may be some difficulties, because it is a rather moody room flower. But if you give her enough attention, she is able to decorate any room with her bright flowers.
In the article you will read about the features of the plant, learn about different ways of reproduction, about the rules of care, as well as about various diseases and pests that affect gloxinia with the wrong content.
Features of the plant
One of the main features of this plant is its sensitivity to light, which directly affects the growing conditions. The delicate leaves of gloxinia will almost immediately get burned if placed in direct sunlight. Therefore, the most optimal lighting for the successful cultivation of this indoor flower - artificial or as diffuse as possible.
Breeding methods
Gloxinia has five ways of cultivation, and each of them can be used only with a certain state of the indoor flower and the time during which it is necessary for the plant to take root. So, let's take a closer look at the methods of breeding a flower, as well as all the rules and subtleties of the process of breeding gloxinia.
Cuttings
 Gardeners use cuttings of gloxinia during the formation of buds, because during flowering, it is necessary to use only healthy green leaves, the cutting of which reaches 3 - 4 cm.
- It is necessary to carefully separate the leaf from the plant with a sharp blade or scissors and place it for 1 - 3 weeks (roots will appear in this time period) in a container with room temperature water.
- And only after this, it is transplanted into a previously prepared soil or peat tablet and placed in a plastic bag for 1.5 - 2 months, i.e. until small leaves appear from the leaf.
It is not necessary to water the leaf in a plastic bag, just place it in the most illuminated place under the scattered sunlight.
Leaf fragments
If you divide a whole sheet of gloxinia into parts, you can get child processes, but they will already be slightly less than in the first method.
- To do this, select the largest leaf of the plant and divide it according to the veins into several parts with a sharp blade, then place each fragment in a separate container, where the moist soil is prepared in advance.
- The leaf sinks a little into the ground, and the rest is pressed tightly against it.
- Next, the container is closed with cellophane and placed in a place lit by bright scattered sunlight.
Watering and airing are not made, i.e. the mother sheet must be at rest for 2 months. As soon as sprouts appear, the faded maternal leaf can be removed.
For more information about the rooting of the sheet gloxinia, read in this material, and here are detailed instructions and tips on how to do it correctly.
Seeds
This is one of the easiest breeding methods produced in early March, when gloxinia begins flowering period.
- The soil in which the seeds will be placed can either be calcined or treated with a solution of potassium permanganate to disinfect it.
- After that, seeds are planted in a loose substrate at a short distance from each other and closed with a dense transparent cover or cellophane to create a mini-greenhouse.
- In a warm, well and properly lit place in 1.5 - 2 weeks, the first shoots will appear.
- And after 1 - 1.5 months, each sprout can be planted in a separate pot.
More details about growing gloxinia from seeds can be found in this article.
Peduncle
 The method is almost identical to the previous two, and it is used during the flowering period of gloxinia.
- In a container filled with water at room temperature for 1 cm., The peduncle, carefully separated from the plant, is placed, the length of which should not be more than 3-4 cm.
- A glass with it is also covered with cellophane or glass.
- As soon as the sprout from the peduncle, and this will happen no earlier than 1 month, they will be deposited in separate pots with a substrate for adult plants.
Learn more about choosing a pot here.
Tubers
When breeding tubers need to be extremely careful, because in the case of one wrong action or movement, everything can be spoiled. Reproduction is done immediately after a period of rest, when sprouts appear on the tuber.
- With a sharp disinfected knife, the tuber is divided into parts so that each of them has at least one healthy sprout.
- Places of cuts are processed with a piece of charcoal, then they are planted in separate containers, put in a properly lit place.
- It is desirable to make watering through the pallet with a small amount of water, because split tuber is particularly susceptible to excess moisture in the substrate.
Transplanting into a large pot is made only when the sprouted roots completely entwine with an earthen clod, so initially it is better to use disposable transparent cups to see this process.
How to grow and maintain care at home?
As mentioned earlier, gloxinia is quite a fastidious indoor plant, and you need to try to ensure that all conditions favorable for its cultivation are observed as accurately as possible.
Illumination
 One of the most decisive factors in the health of a plant: the lack of light will cause its leaves to stretch, thereby trying to reach the light and take an upright position, which is not the norm; and an excess of light will lead to yellowing of leaves and soon wilt.
Light must be scattered otherwise, the leaves will burn and acquire an unpleasant appearance.
If the leaves have a saturated green or dark green color, the flowers in the outlet are directed vertically, then the lighting is correct.
Temperature and humidity
Everything is very simple here, because gloxinia “notifies” that she doesn’t like something: if her leaves go down, the plant suffers from cold and needs watering, but if they take a vertical position, then it experiences overheating.
The optimum temperature is 18 - 20 degrees. It is almost not susceptible to moisture and therefore calmly transfers the usual room level of humidity. But categorically do not tolerate drafts.
Watering
Watering is done regularly from above or through a pallet. The main thing is that moisture does not fall on the leaves. From late October to early March, you need to water less frequently, since at the plant comes a period of rest. Before watering, you need to make sure that the top earthen layer has dried up, otherwise there will be an excess of moisture, followed by rapid decay of the tuber and wilting of the leaves. It is also impossible to overdry gloxinia, otherwise the leaves will begin to turn yellow and dry.
Fertilizer
Top dressing is made 1 time in 10 days, at the same time mineral and organic fertilizers alternate. The plant is no longer fertilized at the end of August and begins only in March, when it is fully awake, i.e. out of the rest period.
The soil
It doesn't matter if it's young or perennial, For transplantation and cultivation of Gloxinia, the following substrate composition is suitable:
- Sodland - 1 hour
- Leafy ground - 2 hours
- Humus - 1 hour
- Coarse sand - 1 hour
To learn how to properly prepare the ground, read here.
Diseases and pests
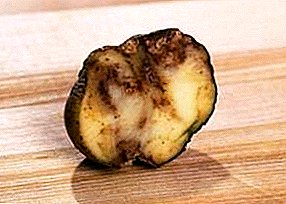
 Tuber rot. One of the most common problems is the rotting of the tuber, and in order to fix it, you need to pull it out of the soil, rinse it, cut the affected areas with a clean, sharp knife, sprinkle it with crumbs of charcoal, hold it in the air for a day to dry, and transplant it into a new substrate.
- Brown spots and gray fluffy patina. These transformations on the leaves, the stem speak of gray rot, which can be removed by cutting off infected leaves and spraying the plant several times with a period of 7 days with oxyfine, copper chloroxide or cuproxate.
- Budding rotting. Rot can be caused by excessive watering or too acidic substrate, replacing which, you can quickly save gloxinia buds. More details about the problems with the buds can be found here.
- Formed mold white on the leaves. Education is late blight, which is the most dangerous disease caused by dense soil, in which there is stagnant moisture, sudden temperature changes and very high humidity.
It is impossible to cure late blight, it can be done only by periodic spraying with such preparations as kuprozan, zineb, polymarcin, captan. This disease manifests itself periodically for many years.
- White small strokes on the leaves and stem of the plant. These manifestations are the consequences of the attack of thrips pests. To get rid of them will help isolate the plant to protect others, and its treatment with any insecticidal drug.
 Tuber rot. One of the most common problems is the rotting of the tuber, and in order to fix it, you need to pull it out of the soil, rinse it, cut the affected areas with a clean, sharp knife, sprinkle it with crumbs of charcoal, hold it in the air for a day to dry, and transplant it into a new substrate.
More information about gloxinia leaf diseases can be found here, and other common ailments, plant pests and treatment methods are covered in this material.
Conclusion
Growing gloxinia is a very laborious process that requires a lot of patience. But the provision of favorable conditions will reward you with the aesthetic appearance of this houseplant, but otherwise it will get sick and die if you do not take certain measures in time.