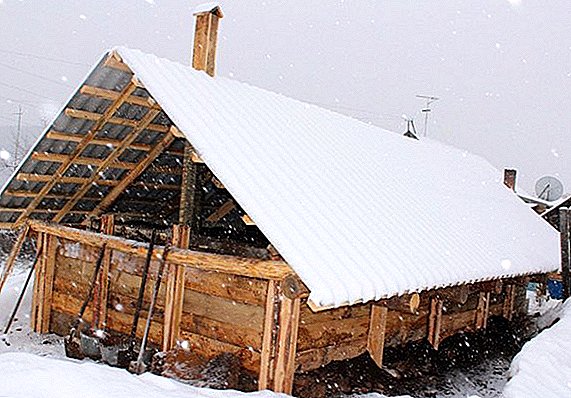
On the eve of winter it is time to worry about the apiary. In this article we will talk about how to build a omshanik for bees with your own hands, figure out how to transfer the insects to wintering, and also find out when it is best to start preparing for the cold.
What is it?
Experienced beekeepers are well aware of what Omshanik is - a special structure for wintering bees, in simple language - the bees winterer. From the side omshanik may look different, as there are different types of it, most often it looks like a dugout, where bee families are located. Winter houses are built mainly in the northern regions, because wintering in the open air has a detrimental effect on bee colonies.
Learn how to do your own hive (Dadana, Varre, multicase, alpine, nucleus), honey extractor, wax furnace, apilift for bees, a slot and a heat chamber in the hive.

These structures can be found in warmer places, but there they are necessary because of the sudden changes in temperature. If you do not have the opportunity to build a winter house or the area in which you live is located in a mild climate zone, then you can consider the option of bees wintering in a barn.
Benefits of using
Wintering bees in omshanik has many positive points. Any living creatures that do not hibernate need more resources to survive. Bees are no exception: with open wintering they eat more honey and suffer significant losses. It is better that they wait for the winter in omshanik. The main advantages of the wintering place for bees:
- Direct protection of insects from wind, cold and temperature changes.
- Insects in wintering need less honey for life.
- The life of the hives will increase significantly, because they simply do not rot, which can provoke changes in the weather.
- Bees are protected from unnecessary stress, provoked by noise.
- Build a wintering place for bees, you can do it yourself.
- But do not immediately grab at building materials, if you have a northern breed of bees, they can spend the winter outside. Omshanik most need such breeds as the Carpathian, gray Caucasian, yellow and steppe Ukrainian bee.

Did you know? A working bee can live up to forty days.
Basic requirements for construction
Starting the construction of omshanik, you need to decide on the place. Wintering is best on the sand. Consider that the area should be quite large, because in order for the omshanik to have an optimal temperature in winter (from 0 ° to 3 °), it must accommodate about 100 hives. You also need to pay attention to the depth of groundwater. This will be one of the decisive factors for choosing the type of wintering.
Then you need to calculate the size of the omshanik. For this you need to know the following:
- the largest number of families that will be there;
- parameters of hives and their layout.

Knowing the size of the hives, rows and passages between them, we can calculate the width of the structure. In order to calculate the length of the omshan, the number of hives must be divided by the number of tiers, and the resulting value divided by the number of rows. The volume will depend on the type of your hives: for 1 bee family, for a single-wall hive, 0.5 cubic meters are needed, and for a double-walled one - 0.9 cubic meters. m
Doors winterizer will need to be warmed. The lateral faces of the structure should point to the south and north. The floor should be made at least 20 cm thick. The ventilation should be built from boards, bends in the attic and outside should be warmed, it is also best to make an adjustable system.
Popular species
There are three types of Omshanik: aboveground, semi-underground and underground. In order to choose the right kind of wintering, you need to focus on the climate, humidity and depth of groundwater.
Did you know? To make one kilogram of honey, bees need to pollinate eight million flowers.
Underground
They are considered the best type of buildings for wintering bees. Omshanik is located underground, and its ceiling is at ground level. It is recognized as the best because it keeps the temperature qualitatively. You can build an underground omshanik, if the depth of groundwater from 3.5 meters.

In autumn, winter and spring, bees need to be fed. For this, beekeepers make candy or honey.
Subterranean
It is believed that it is advisable to build such an omshanik when there is no possibility to fully deepen the structure, and the climate does not allow it to build above the ground. The depth of groundwater should be from 2.5 m. In this case, the walls of the wintry can be immersed to a depth of 1.5 m. 
Ground
They are built in a relatively mild climate or when the groundwater is at a depth of less than 1 m. When building, you need to take care of good thermal insulation to avoid temperature fluctuations.

How to build a winte
In order to build a good omshanik, you need to be able to handle the tools in an acceptable way. Consider exactly what materials are needed for the construction of the wagon.
Required materials and tools
For the construction of the winterer will need:
- edged boards;
- adobe;
- limestone;
- reed slabs and bricks.
Important! Do not build omshanik of cement blocks. They do not have good thermal insulation.
You will also need: an excavator, shovels, concrete mixer, level, hammer, nails, soft foam or clay, circular saw or chisel. If you have the necessary building materials and tools, you can begin.
Omshan building
We will tell the method of construction using the example of an underground omshanik, since it is the most practical and common:
- First you need to dig a pit where our omshanik will be built. In this process, you will be helped by an excavator and a truck for the export of land. It will be very difficult to cope with a shovel, as you have to dig to a depth of 2.5-3 meters.
- Once the pit is ready, you need to do the alignment of the walls and the bottom of the pit and immediately outline the future ladder.
- Then you need to make a formwork for the foundation. It is made of boards.
- Pouring concrete in the formwork, for durability and durability, you can add large stones and cobblestones.
- After the concrete has dried, engage in laying out the walls. Buying new bricks for the layout is not economical, it is best to take old materials. If the wall thickness is half a brick, then it is better to reinforce the structure with metal wall cladding.
- In order for the walls not to collapse, it is necessary to tamp the outer voids in the new rows with a layer of clay.
- After the construction of masonry, engage in metal strapping walls. To do this you will need metal pipes and ceiling rails from the channel. The strapping should be done like this: drive four pipes along the walls, the pipes should be thick-walled, then weld the pipes with crossbeams from the channel in pairs.
- Then comes the time of a difficult stage - the casting of ceiling tiles. Before you start, build formwork on wooden supports and weld the wire sheets that you will lay in the raw concrete of future slabs.
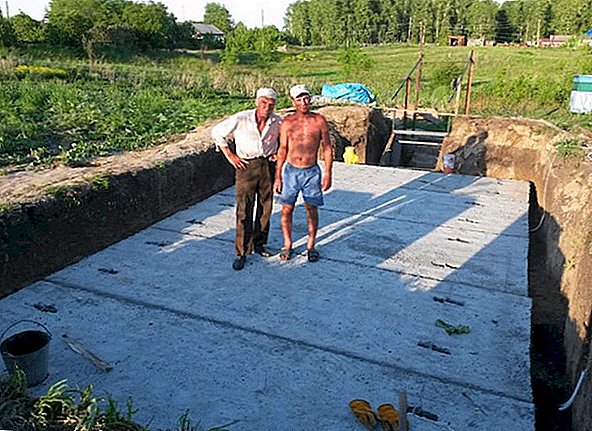
- Knead the concrete and pour it into the formwork lined with cellophane. In reinforced concrete, place the reinforcement mesh in 2 layers, they will become a reliable skeleton for slabs.
- After your plates are dry, you need to take care of thermal insulation. Put a layer of insulation on them, and cover the top with roofing felt so that the water does not destroy the concrete, and the insulation remains dry.
- After these steps, begin to mount the vent.
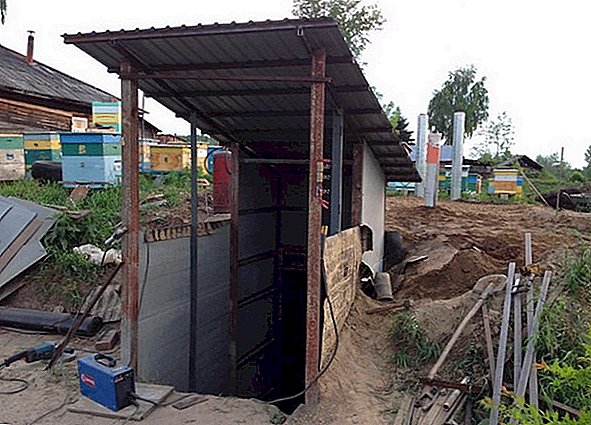


Important! The hood area must be calculated from the number of families. Insufficient diameter will adversely affect the temperature inside the omshanik.
Transfer hive
In the question of when it is best to bring the bees into a wintery, there are some nuances. It is necessary to choose the right moment of transfer and observe important rules.
Timing
Do not hurry. For a good wintering bees must prepare. Give them the opportunity to make the last cleansing flights, so that they can get rid of excess fecal masses in the intestines.

Wait until the outside temperature stably stays at 0 ... +3 ° C, this is necessary so that the bees do not get worried about the temperature difference when transferring them to the wintery. It is believed that the best time for transferring bees to omshanik is the beginning of November in areas of Siberia and the end of November in more southern regions.
The most valuable of bee products, honey differs by its properties, depending on which plants it was harvested from. Read about the benefits of lime, buckwheat, pumpkin, phacelia, chestnut, acacia, espartsetovogo, rapeseed, coriander honey.
rules
When transferring bee colonies, in addition to the last overflights, It is important to follow these rules:
- Choose a day to be dry. You can not bring into the premises of raw hives. This simple measure will help avoid the appearance of fungus.
- Take care to transfer the entire apiary for 1-2 days. Bother the bees as little as possible.
- When placing beehives on racks, place strong families on the lower shelves, and weak ones on the top, it is warmer there. After the bees have calmed down, you can open the lower and upper yole.
- Sunlight should not penetrate into omshanik. Red lights are used to track sensor readings.
- Do not disturb bees with frequent visits at the beginning of winter. By the beginning of spring, you can increase the number of visits, because in families the offspring appears and honey consumption increases. At this time, you need to strengthen the ventilation, so that there is no excess carbon dioxide.
- If the winter in your region is harsh, then be sure to warm the hives with pillows.
Important! To monitor the climate, it is better to use two thermometers and one hygrometer. These devices will help to keep the premises in the most comfortable for the bees framework.
Thus, using tips on building omshanik and following the rules for transferring bees to wintering, you will make their winter holidays comfortable and safe, help them gain strength before the new season. And you do not have to worry about the safety of bee colonies.


